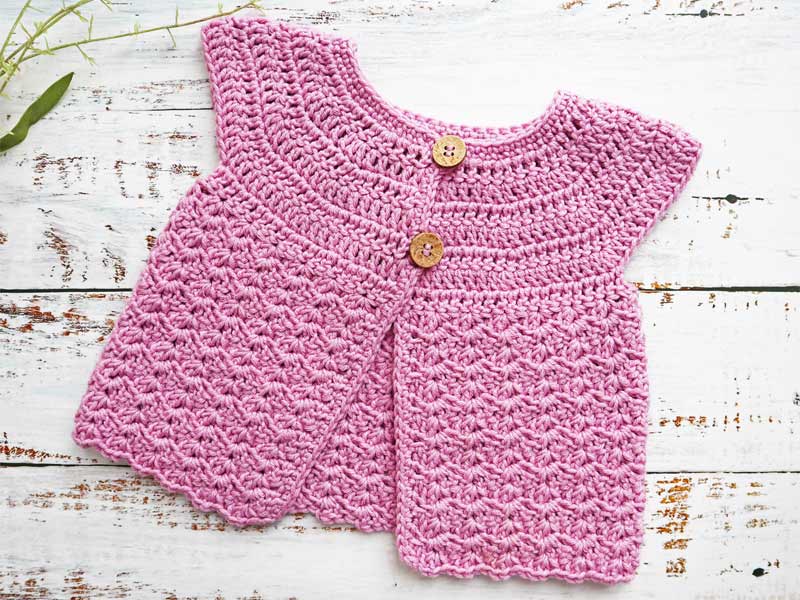
This cute and feminine crochet baby cardigan, is so adorable to wear with a light floral dress on a warm spring or summer day. It has a beautiful vintage-like look, and fits perfectly with adorable dresses and more. It is crocheted in soft Cotton Merino with a 4 mm. crochet hook, and is very nicely light and soft, as it is crocheted in the incredibly delicious yarn, Drops cotton merino, which is great to wear directly against the skin even for delicate toddlers.
The name Parisian Cardigan comes from the beautiful stitch that I used for this pattern, called “Parisian Stitch”. This cardigan is easy and simple to crochet and you can easily join even if you are only quite new to crochet.
You can find the free patterns below in size 3-6 Months. If you want to make the Cardigan in other sizes you can buy the ad-free PDF pattern in sizes from 3-18 months right here: PARISIAN CROCHET BABY CARDIGAN
Materials
Gauge
- 15 ST and 8 Rows = 8 x 8 cm. (STGM)
- 20 ST and 11 Rows = 10 x 10 cm. ( Parisian ST Pattern)
Abbreviations
- ST – Stitch
- CH – Chain
- SL ST – Slip Stitch
- SC – Single Crochet
- HDC – Half Double Crochet
- DC – Double Crochet
- DC INC – Double Crochet Increase (DC 2 in the same ST)
- GR – Groups (a group of stitches which are crocheted into the same ST or CH-space)
Pattern Notes
- Sizes: 3-6 mos.
- Measurements: Chest: 48 cm. Full length: 25 cm.
- Skill level: Easy
- Explanation: This Cardigan is crocheted from the top down with an increasing number of rows.
- Terminology: The Pattern is written in US crochet terms.
Instructions size 3-6 months
CH 53
Row 1. SC in 2nd CH from the hook and next 51 CH (52 SC). CH 2 (These do not count as a ST. This applies throughout the pattern). Turn your work.
Row 2. *DC in next 3 ST. DC INC in next ST.* Repeat from *-* across the row. DC in the last 4 ST (64 DC). CH 2 and turn.
Row 3. *DC in next 4 ST. DC INC in next ST.* Repeat from *-* across the row. Make 1 more DC in the last ST (77 DC). CH 2 and turn.
Row 4. *DC in next 5 ST. DC INC in next ST.* Repeat from *-* across the row. Make 1 more DC in the last ST (90 DC). CH 2 and turn.
Row 5. *DC in next 6 ST. DC INC in next ST.* Repeat from *-* across the row. Make 1 more DC in the last ST (103 DC). CH 2 and turn.
Row 6. *DC in next 7 ST. DC INC in next ST.* Repeat from *-* across the row. Make 1 more DC in the last ST (116 DC). CH 2 and turn.
Row 7. *DC in next 8 ST. DC INC in next ST.* Repeat from *-* across the row (128 DC). CH 2 and turn.
You have now finished the increasing rows in the yoke, and you will now need to shape your cardigan and divide it by the sleeves.
Row 8. DC in first 20 ST (Front piece). CH 3. Skip next 24 ST (Armhole). DC in next 40 ST (Back piece). CH 3. Skip next 24 ST (Armhole). DC in last 20 ST (Front piece). (80 DC + 6 CH = 86 ST). CH 1 and turn.
You will now continue to work the Parisian Stitch Pattern, which is described in row 9.
Row 9. HDC in first ST. Skip next ST. *(2 DC. 1 CH. 1 SC in next ST). Skip 2 ST.* Repeat from *-* across the row until you have 2 ST left of the row. Skip next ST. HDC in the last ST (28 GR + 2 HDC = 114 ST). CH 1 and turn.
Row 10-25. HDC in first ST. Skip next ST. *(2 DC. 1 CH. 1 SC in next CH-space from previous row). Skip 3 ST.* Repeat from *-* across the row, until you have 3 ST left of the row. Skip 2 ST. HDC in last ST (28 GR + 2 HDC = 114 ST). CH 1 and turn.
Make a nice border of SC that goes all the way around the edges, as well as the neckline. When you get to the place where you want to place your buttonholes, make 4 CH and SC in the next ST.
Fasten off and weave in the yarntails thoroughly. Sew the buttons into your cardigan, exactly from the buttonholes on the opposite side.
Watch the detailed video tutorial on how to make the cardigan
Copyright
This crochet pattern and all the related images belong to Adorecrea.com. Do not modify, copy, sell or share this pattern as your own. You are welcome to make and sell as many crochet Baby Cardigans made from this pattern as you like. But please link to Adorecrea.com, when you post pictures online of the items that you make from this pattern.
Thank you! And happy crocheting 🙂
This blogpost contains affiliate links.
